
Moving to a new home is exciting — until you reach the kitchen. From fragile glassware to oddly shaped pots and appliances, this room can feel like the hardest one to handle. Whether you’re moving across London or just around the corner, knowing how to pack kitchen items moving efficiently can save you stress, time, and money.
In this guide, our expert movers at Kash Mover share practical, real-world tips that make packing your kitchen safe, simple, and stress-free.
Why Packing the Kitchen Is the Hardest Part of Moving
When it comes to relocation, the kitchen is often the most complex room to pack. Here’s why:
- It contains a wide range of items — from delicate glassware to heavy appliances.
- Each item needs a different type of packing material.
- Many people keep sentimental or high-value items in the kitchen.
- Cleaning and decluttering take longer due to grease, food, and utensils.
The kitchen also requires planning because you’ll still need to use it before moving day. Most people underestimate how much time it takes to pack kitchen items moving, and they end up rushing through the process — leading to broken plates, misplaced lids, or damaged appliances.
Step-by-Step Guide to Packing Kitchen Items for Moving
1. Declutter Before You Pack
Before touching a single box, go through every cupboard and drawer. Ask yourself: “Do I really need this in my new kitchen?”
- Keep: Daily-use items, good cookware, favorite dishes.
- Donate: Duplicate utensils, unused appliances.
- Discard: Chipped mugs, broken lids, expired food.
Decluttering helps reduce your load, saves packing time, and cuts moving costs. When you plan to move entire household items, you can also consider home movers services that handle sorting and packing for you.
Pro Tip: The less you pack, the less you’ll unpack. Simplify your kitchen now, and you’ll thank yourself later.
2. Gather the Right Packing Supplies
Good packing materials protect your kitchen — bad ones cost you broken dishes.
Here’s what you’ll need:
- Sturdy cardboard boxes (small and medium)
- Bubble wrap and packing paper
- Heavy-duty tape
- Stretch wrap for appliances
- Labels or color markers
- Dish-pack boxes (if available)
| Item Type | Recommended Box Type | Extra Tip |
|---|---|---|
| Plates, bowls | Small boxes | Stack vertically with paper between each |
| Glasses, mugs | Cell boxes | Use dividers or wrap each piece |
| Pots & pans | Medium boxes | Stack by size and add padding |
| Cutlery | Wrap bundles in paper | Tape bundles to keep organized |
| Appliances | Original boxes (if any) | Add soft padding around cords |
By preparing these materials early, you’ll make it easier to pack kitchen items when moving without scrambling at the last minute.
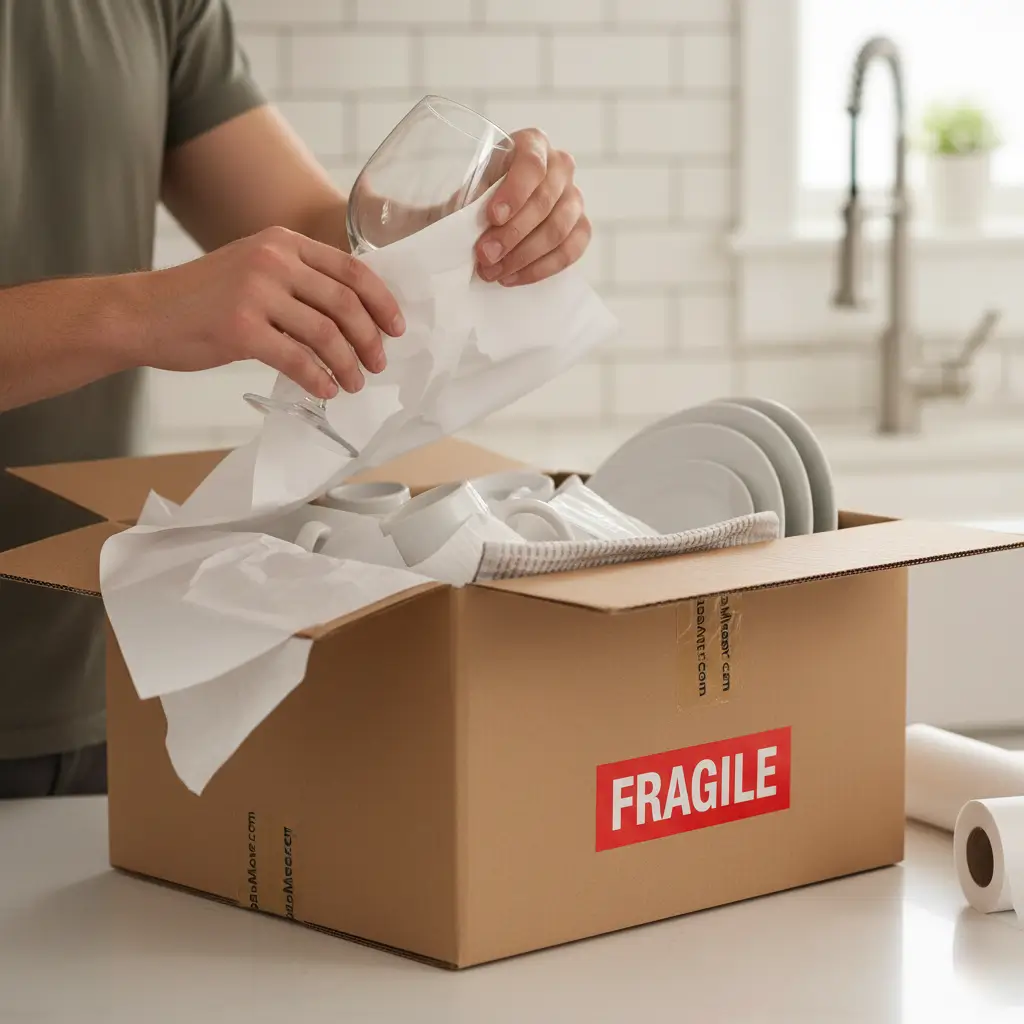
3. Pack Fragile Kitchen Items Safely
Fragile items are often the first casualties of a move. Here’s how to keep them safe:
- Line each box with a layer of crumpled paper or towels.
- Wrap each item individually — never stack unwrapped plates or glasses.
- Place heavier items at the bottom and lighter ones on top.
- Use dividers for glasses or stemware to prevent collisions.
- Seal and label boxes clearly as “FRAGILE – THIS SIDE UP.”
A smart trick used by professionals is to stack plates vertically like records — they’re less likely to break that way. When you pack kitchen items moving carefully, you ensure your dinnerware arrives safely, ready for your first meal in your new home.
4. How to Pack Pots, Pans, and Utensils
These are bulky but less fragile — the goal is efficient stacking.
- Nest pots and pans together with paper or towels between them.
- Wrap lids separately and tape them to their pots.
- Bundle utensils by category (spoons, knives, spatulas).
- Keep sharp knives wrapped in cardboard sleeves or dish towels.
If you’re relocating from an apartment, professional apartment movers can provide specialized boxes for cookware to prevent scratches and dents.
Mover Insight: Don’t overload boxes with metal items — a few small, balanced boxes are easier and safer to carry.
5. How to Pack Pantry and Food Items
Pantry items can easily create a mess during a move if not packed wisely.
Follow these steps:
- Check expiration dates. Toss anything expired or near expiry.
- Pack sealed food only. Avoid open jars or liquid items.
- Use small boxes. Food adds weight quickly.
- Use resealable bags. Great for spices, grains, or sugar.
- Avoid glass jars unless tightly sealed and wrapped.
Non-perishables such as canned goods can travel safely, but anything frozen or fresh should be consumed before moving. Remember, the goal is to pack kitchen items moving cleanly and without leaks.
6. Label Everything Clearly
Labeling is not just about organization — it’s about saving time and avoiding confusion later.
Try these easy systems:
- Color-code boxes (red for fragile, green for pantry, blue for cookware).
- Write the contents and the destination room on two sides of each box.
- Add handling instructions like “Fragile” or “Heavy.”
When movers see clear labels, they can load and unload efficiently. A few minutes of labeling can save hours of frustration on moving day.
7. Keep an Essentials Box
Your first day in the new home will be smoother if you have a small essentials box ready.
Include:
- 2–3 plates and glasses
- A few utensils
- Dish soap, sponge, towel
- Snacks, coffee, and mugs
- Trash bags and paper towels
Keep this box in your car or load it last into the moving van. It ensures you can eat and clean without hunting through sealed boxes. If you’re using Man and Van services for smaller moves, they’ll make sure your essentials stay accessible.
Pro Tips from Expert Movers
After helping hundreds of families move kitchens safely, Kash Mover experts share these insider lessons:
- Start early — at least one week before the move. Begin with rarely used items and progress toward daily essentials.
- Avoid newspaper wrapping. The ink can stain dishes and cups. Use clean packing paper instead.
- Use soft linens and dish towels. They’re perfect for wrapping and reduce the need for extra materials.
- Secure appliances properly. Tape cords to avoid tangles and remove detachable parts.
- Never overfill boxes. A slightly under-filled box with padding is safer than an overstuffed one.
- Keep valuables separate. Store expensive knives, porcelain, or heirloom dishes in a personal box.
If you want affordable professional help, check Affordable Moving in London for cost-effective packages. And if reliability matters most, explore Best Movers in London — trusted teams that know how to handle kitchens with care.
Mover’s Note: The most common damage happens when people rush. Give yourself time, label carefully, and pack smart.
Final Kitchen Moving Day Checklist
Here’s a quick checklist you can print or save on your phone:
| ✅ Task | 💡 Notes |
|---|---|
| Declutter and donate unused items | Do this one week before moving |
| Gather packing materials | Boxes, tape, bubble wrap, markers |
| Pack rarely used items first | Baking tools, serving dishes |
| Wrap fragile items carefully | Use paper or bubble wrap |
| Label every box clearly | Room + contents + “Fragile” if needed |
| Keep essential items separate | Coffee, snacks, basic utensils |
| Check the pantry for spills or leaks | Quick wipe-down after packing |
| Check pantry for spills or leaks | Use sealed bags for safety |
Completing this checklist ensures every step of pack kitchen items goes smoothly — from start to finish.
Conclusion
Packing your kitchen doesn’t have to be stressful. With the right materials, a bit of planning, and professional tips, you can move your entire kitchen safely and efficiently.
Take time to declutter, pack carefully, and label everything clearly. Whether you’re managing the move yourself or using trusted experts like Kash Mover, these steps make the process smooth and damage-free.
Ready to move your kitchen with confidence? Explore our home movers or apartment movers services today for reliable, affordable relocation support.
FAQs
Use small boxes, wrap each item separately, and stack plates vertically. Label boxes by category for easy unpacking.
Wrap each dish and glass with paper or bubble wrap. Use dividers and add padding at the bottom of boxes.
Only pack sealed and non-perishable food. Avoid open containers, frozen items, or liquids that can spill.
Skip hazardous cleaners, expired food, or opened liquids. These can leak or damage other items during transport.
Start at least one week in advance. Pack rarely used items first and daily essentials last.